Set Up Dynamic Subtitles
NOTE Dynamic Subtitles is one of the Autograf Rigging Utilities. It is supported in Templater 3.4 and later.
Using the Dynamic Subtitles rigging utility and an SRT file referenced in your data source, you can dynamically add onscreen text to your Templater customized video compositions. Only SRT files are supported at this time.
Dynamic Subtitles has two components:
- SRT Rig: Framework for dynamic subtitling in your comp
- SRT Stack: Expands the rig with a series of layers that each apply to a single subtitle
NOTE Due to limitations of After Effects, subtitles cannot be embedded in the exported file as a separate data stream.
This article provides an overview of the entire workflow for using Dynamic Subtitles in a composition. You should perform the tasks in the order shown.
Before you begin
- Create a composition with at least one dynamic footage layer and link it to your data source.
- In your data source, include an
srt-dataproperty or column to reference the SRT file. -
Note the frames per second (FPS) so that you can make sure your subtitles sync correctly.
WARNING If your footage asset is a video, Dynamic Subtitles automatically matches the settings in your SRT file to the video. If the video duration is shorter than indicated in the subtitle file, the subtitles are trimmed to match the video length.
 Where can I see the FPS for my composition?
Select your composition in After Effects and then click Composition > Composition Settings. The FPS value is in the Preset field.
Launch the Dynamic Subtitles Rigging Utility
You can choose to launch the Dynamic Essential Properties utility as a floating palette. If you plan to use Dynamic Subtitles frequently, you may prefer to dock the palette in your After Effects workspace.
- Open Adobe After Effects and launch Templater.
- To use Dynamic Subtitles from a floating palette:
- In the Templater panel, click the wrench
 icon at the bottom left of the Batch Assets section. This launches the Autograf Rigging Utilities window.
 - Click the Dynamic Subtitles
 icon to launch Dynamic Subtitles. In the panel on the right, the SRT Rig tab is shown by default.
- In the Templater panel, click the wrench
- To use Dynamic Subtitles from a docked palette:
- In After Effects, go to Window > Templater Dynamic Subtitles.jsxbin.
- When the Dynamic Subtitles palette appears, click the name of the palette, then drag and drop it where you want it in your workspace.
Once you have placed the palette, its location is stored by Templater for future sessions. For each new After Effects session, you must launch the Templater panel (Templater <version>.jsxbin) before you can launch Dynamic Subtitles.
Create the SRT Rig
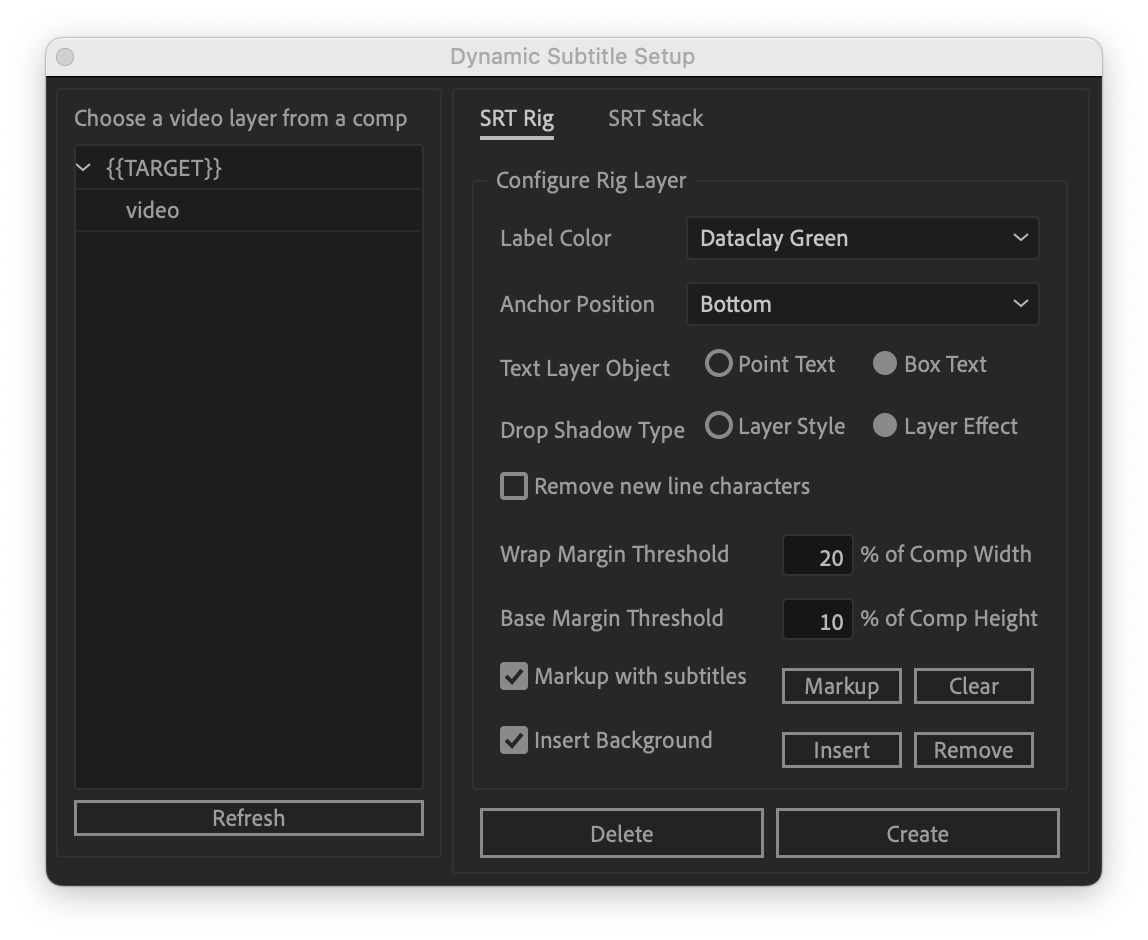
This image shows the Dynamic Subtitles Setup screen for Templater 3.5. If you're using a previous version, your dialog may look different.
- If you haven't already done so, launch Dynamic Subtitles.
- In the left panel of the Dynamic Subtitles dialog, select the composition and then the dynamic footage layer you want the subtitles to be superimposed on.
- Select a Layer Color for your subtitle layers from the drop-down. The color is to help you recognize these layers in the timeline. It does not affect the text or background color of your comp. This menu is already populated with the colors shown in After Effects > Preferences > Labels.
-
Templater 3.5 or later: For Anchor Position, the default value is Top. If you want to change this, you can select Middle or Bottom from the drop-down. If you create an SRT Stack, the anchor position carries through to all srt-display layers. Changing this setting on the individual layer level is not supported.
How does the anchor position setting affect my subtitle text?
The Anchor Position is the point from which your text scales. If you select box text, it is also the point from which your text wraps. If you select Top, the anchor position is set at the top of the x-height for the chosen font. Scaling is from the top down. Box text wraps below the anchor position.
If you select Middle, the anchor position is set at the middle of the x-height for the chosen font. Scaling is from the center of the subtitle text. Box text wraps both above and below the anchor position.
If you select Bottom, the anchor position is set at the bottom of the x-height for the chosen font. Scaling is from the bottom up. Box text wraps above the anchor position.
- Templater 3.5 or later: For Text Layer Object, the default value is set to Box Text. This wraps the text to fit in a box size you set. Select the radio button for Point Text if you want to change this. This setting adapts the box size to the line of text, regardless of how long that line might be.
- Templater 3.5 or later: For Drop Shadow Type, the default value is Layer Effect. This setting uses the drop shadow from the AE Effects layer, and works best from an automation context. If you prefer to fine-tune the drop shadow manually, select the radio button for Layer Style.
- Templater 3.5 or later: If you kept the default or selected Box Text, configure these additional settings:
- Sometimes SRT files include hidden characters to indicate new lines. If you want Templater to remove these characters and form new lines solely based on the size of your text box, select the Remove new line characters checkbox.
- For Wrap Margin Threshold, enter a numeric value as a percentage of comp width. This determines the left and right margin on each side of the text box in relation to the comp. The default value is 40%. This setting is persistent even if the amount of text or the size of the font changes.
- For Base Margin Threshold, enter a numeric value as a percentage of comp height. The default value is 20% This determines the bottom margin of the text box in relation to the comp. This margin is persistent even if the amount of text or the size of the font changes.
WARNING Anchor Position and Wrap Margin Threshold values cannot be changed once the SRT Rig is created. We recommend you review your timeline first so that you can set values that work with all your data.
-
To display markers with subtitles by default, select the checkbox. You can also use the Markup and Clear buttons to toggle this on and off as needed.
NOTE The Markup and Clear buttons apply to an individual iteration of your comp. To include subtitle markers at the rig level in every iteration, select the checkbox.
Do I need subtitle markers?
Subtitle markers let you see where each subtitle begins and ends as the underlying footage plays. This can be helpful when you iterate through your dynamic footage, especially if your footage assets are of different durations.
-
To insert a background layer to your SRT Rig by default, select the checkbox. You can also use the Insert and Remove buttons to toggle this on and off as needed.
NOTE The Insert and Remove buttons apply to the current iteration of your composition. To include a background layer for the SRT Rig in every iteration, select the checkbox.
- Click Create.

After you click Create, the SRT Rig is added to your comp and you will see up to three new layers:
- srt-display: Enables you to configure a variety of settings related to the appearance of your subtitles, including font, color, size, location in the comp, and so on. You can also configure some of these values from your data source. This is a reserved column name.
- srt-bg: Included if you add a background layer to your SRT Rig. This is a reserved column name.
- srt-data: Enables you to separately configure the subtitle data. This is a reserved column name.
Set Styles for the SRT Rig
When you create an SRT Rig, Templater automatically adds all of the Dynamic Subtitles settings to the After Effects Essential Graphics panel. To use this panel, navigate to Windows > Essential Graphics and then dock the panel where you want it.
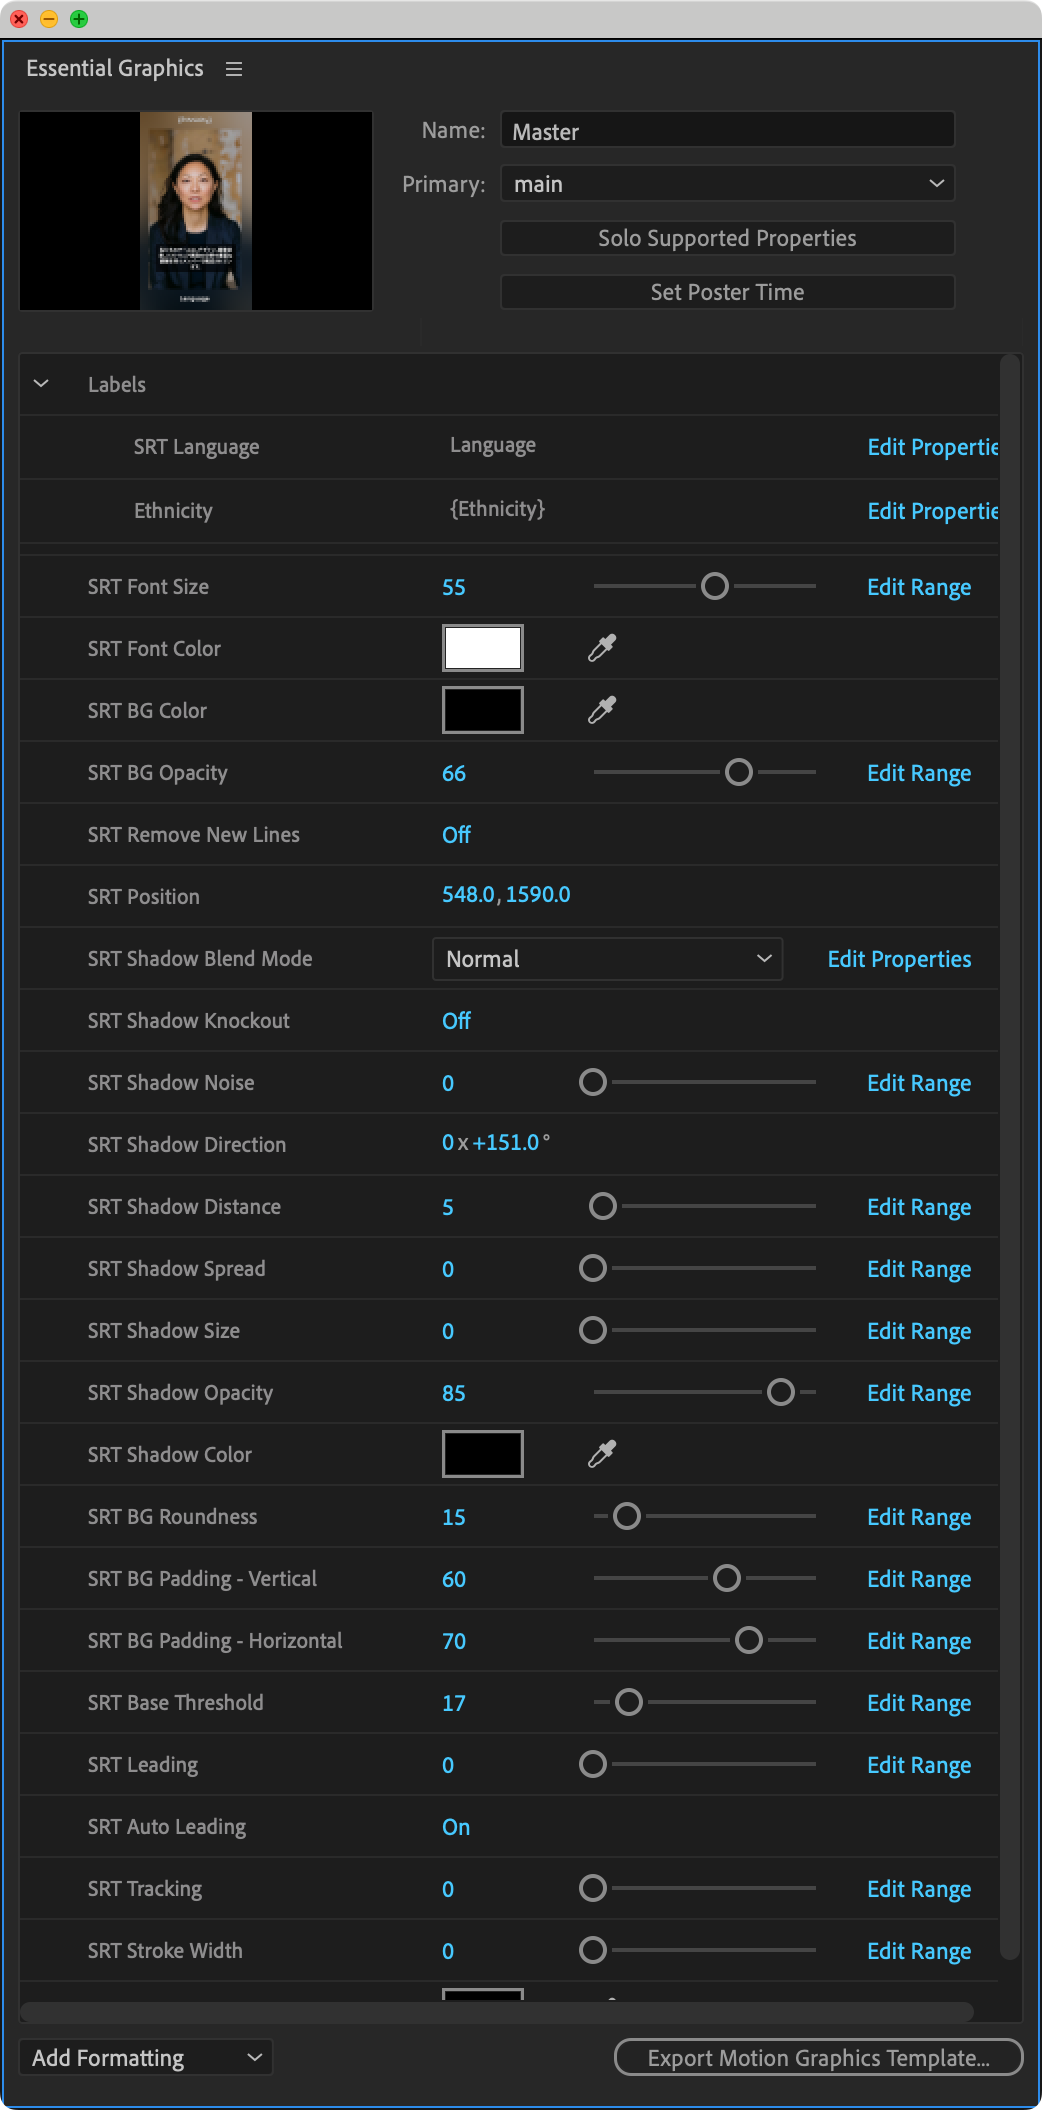
You can use the Essential Properties panel to configure settings for the srt-display layer. These style settings apply to each subtitle in your video composition. If you need more granular control over specific subtitles, you can create an SRT Stack.
We recommend that you take time to style the rig first, since your stack will then have the rig values as defaults.
Adjusting Essential Properties values should already be familiar to you from your use of After Effects and Templater. If you need additional information about them, consult your After Effects documentation.
Create an SRT Stack
The SRT Stack is a set of up to two layers for each subtitle you add to your comp: srt-display and srt-bg. The stack gives you granular control over the position, font, background, and so on for individual subtitles.
If you have a lot of subtitles, creating an SRT Stack can result in a significant number of layers. If you don't need this level of control, you can skip this task. In this case, each subtitle layer in the stack inherits the styling of the SRT Rig.
- If you haven't already done so, launch Dynamic Subtitles.
- In the left panel, select the composition you want to add the SRT Stack layers to.
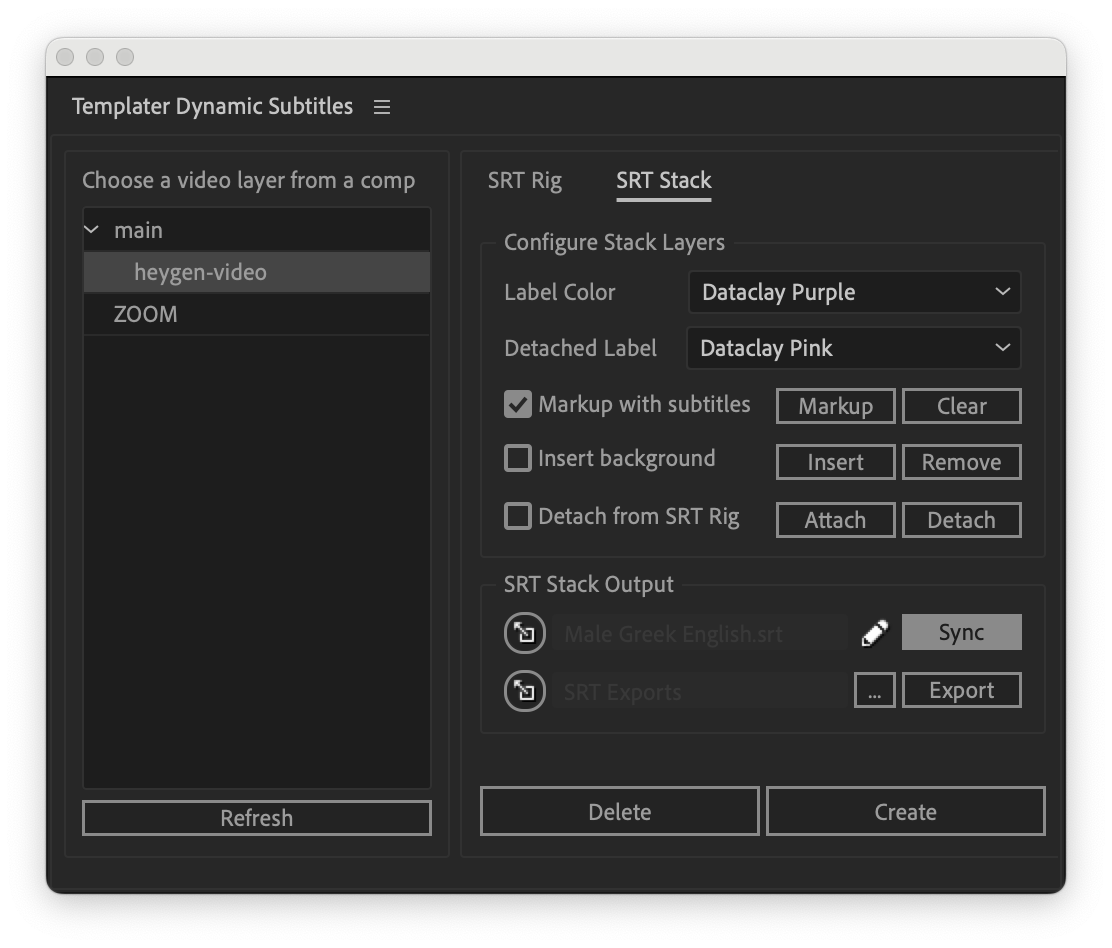
- Click the SRT Stack tab.
- Select a Layer Color for individual subtitle layers from the drop-down. The color is to help you recognize these layers in the timeline. It does not affect the text or background color of your comp. This menu is already populated with the colors shown in After Effects > Preferences > Labels.
- If there are individual subtitles that you want to look different from the styles set in the SRT Rig, you will need to detach those layers. To make detached layers easy to distinguish, select a different color for Detached Label from the drop-down. This menu is already populated with the colors shown in After Effects > Preferences > Labels. This can be very helpful when you're working on large numbers of subtitles and layers.
-
If you want to display markers with subtitles on the stack layers by default, select the checkbox. You can also use the Markup and Clear buttons to toggle this on and off as needed.
NOTE The Markup and Clear buttons apply to the current iteration of your comp. To include markers for every subtitle in every iteration, select the checkbox.
-
To Add a background layer to each subtitle layer by default, select the checkbox. You can also use the Insert and Remove buttons to toggle this on and off for individual subtitle layers as needed.
NOTE The Insert and Remove buttons apply to the current iteration of your comp. To include a background layer for every subtitle in every iteration, select the checkbox.
-
To Detach from SRT Rig by default, select the checkbox. This detaches all the layers for every subtitle so that you can work on them individually. You can also select a single subtitle layer, and then use the Attach and Detach buttons to work on that subtitle's layers only.
WARNING If you click the Detach button without selecting a layer first, all layers for all subtitles are detached. Templater will ask you to confirm that this is what you want to do.
Should I detach all layers from rig when creating an SRT Stack?
You can only change the styling of an individual subtitle if its layers have been detached from the rig. You must also keep that subtitle's layers detached after styling. If you reattach a layer, it reverts back to the rig settings and the individual styling is lost.
If you know you need to style all or most of your subtitles individually, detaching all layers up front can save you time. The detached layers have the same initial settings as those you configured for the SRT Rig.
On the other hand, it might make more sense to keep the layers attached by default if:
- Most of your subtitles can use the rig values.
- You have a lot of subtitle layers and are afraid you'll lose track of what you've worked on if they're all detached.
You can then use the Detach and Attach buttons for the subtitle layers you need to configure separately.
- Click Create. Depending on your data and composition, SRT Stack creation can be time intensive and result in many additional layers in the current timeline.
Delete an SRT Rig or SRT Stack
You can delete an SRT Rig, SRT Stack, or both. For example, you might have created the rig for the wrong comp, or need to revert many individual layer changes.
NOTE Deleting an SRT Rig does not automatically delete the associated SRT Stack. This protects you from accidentally deleting a stack that has lots of individually configured layers.
- If you haven't already done so, launch Dynamic Subtitles.
- In the left column of the dialog, click the comp with the SRT Rig or SRT Stack you want to delete.
- To delete the SRT Rig:
- Click Delete.
- Click Yes to confirm.
- To delete the SRT Stack:
- Click the SRT Stack tab.
- Click Delete.
- Click Yes to confirm.
Related Topics
