Setting up Google Drive as a Remote Footage Source
There are currently three methods for using media files stored in Google Drive as remote footage in Templater.
-
Using the Media Connector for Google Drive in Templater.
-
Using Google Drive for desktop to sync Drive files to the machine running Templater.
-
Adding footage files individually via Templater's GoogleFile Picker. (deprecated)
The Media Connector for Google Drive and the Google File Picker methods both enable using share links or direct download links as footage asset references in your data source. Using the Google Drive for desktop app mounts a virtual drive, so footage asset references in your data source are local file paths relative to the source Footage path defined in the Templater panel.
Each method has advantages and disadvantages, which are outlined below.
TIP You can use footage from Google Drive regardless of which data source you are using—you are not limited to Google Sheets. You can also mix local footage references with Drive URLs in your data.
 Setting up Media Connector for Google Drive
Want to use Google Drive share link or download link URLs as footage asset references? You can use the Media Connector for Google Drive to enable access to all of the files your Google Account can access, regardless of whether their share status is private or public, as well as whether you are the owner or if the files are shared with your account.
For context, Google has been making changes to improve security for any third-party applications that connect to their APIs, which impacts Templater's functionality. In Templater 3.7 we released the new File Picker workflow for connecting to Google Sheets to comply with Google's new guidelines. In doing so, we've made changes to the access permissions requested by Templater, moving from a scheme that required full access to all of a user's Google Drive files, to one where you choose the individual files that you want Templater to be able to read and modify. Because Templater is no longer granted access to all of the files in an authorized account's Google Drive, it can no longer automatically utilize remote footage links to media files contained in that Google Drive account. For Templater 3.7.2 and newer, we created the Media Connector for Google Drive to re-enable account-wide access to media files stored in Google Drive. This process is a bit more involved to set up, but it will securely grant Templater access to any files in a user-authorized Google Drive.
NOTE The account that you use to log in to Google Sheets does not have to be the same account as the one you use to access Google Drive.
Part 1: Create a new Google Cloud Platform Project
NOTE The Google Cloud Platform interface is subject to change at any time, so some descriptions or screenshots represented here may end up being out-of-date.
In order to use the Media Connector for Google Drive, you need to create a new Project on Google Cloud Platform with the appropriate API permissions. This setup grants Templater read-only access to all files on a Google Account's Google Drive. This security improvement changes the scope from read-and-write to read-only, and shifts access control from Dataclay's Google Sheets integration into the user's own Google infrastructure.
Creating a Google Cloud Platform Project should not incur any costs.
NOTE Please contact your organization's Google Workspace or Google Cloud Platform administrator if you have issues with access to the GCP features described in this guide.
-
Open a browser and navigate to https://console.cloud.google.com. Be sure that you are signed in with the desired account.
-
Click on button to the right of the Google Cloud header logo to open the project picker modal. The button may display as Select a project if no projects have been created in this GCP account, or it may be the name of the most recently selected Project or GCP Organization.

-
Click New project in the top right corner of the Select a project(or Select a resource) modal.

-
Type a name for the new Project. Select an Organization. If you are using a non-Workspace account, you will not have the option of adding this Project to an Organization. Then click Create.
NOTE If the account used to set up the Project is part of an Organization and this org is chosen during the setup process, you should only have to login once when authenticating with Templater. However, if the account used is a personal Google Account with no Organization, Google will require that the account re-authenticate with Templater once every 7 days.
-
Open the project picker again by clicking the button between the Google Cloud logo and the search bar. This button may display as Select a project in the top menu bar, or it will show the most recently selected Project title. Choose your newly created Project from the Select a resource (or Select a project) modal's list. You should also see a toast notification at the bottom of the browser window that says Now viewing project "<Your Project Name>" in organization "<Your Organization". Be sure that the name of your Project is visible in the project picker button in the top menu bar for the following steps.
-
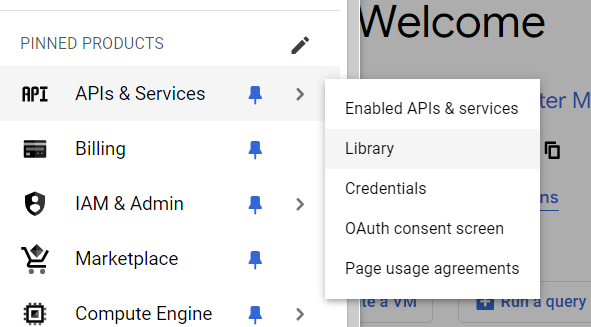
Click on the Navigation Menu icon in the upper-left hand corner of the page and choose APIs & Services > Library.
-
On the API Library page, search for "Drive" in the Search for APIs & Services field and select Google Drive API from the results list. On the Product Details page for the Google Drive API, click Enable.

-
Once the Google Drive API has been enabled, click on MANAGE or click on the Navigation Menu in the upper-left-hand corner and navigate to APIs & Services > Enabled APIs & services. Finally, click on Credentials in the left-hand menu.
-
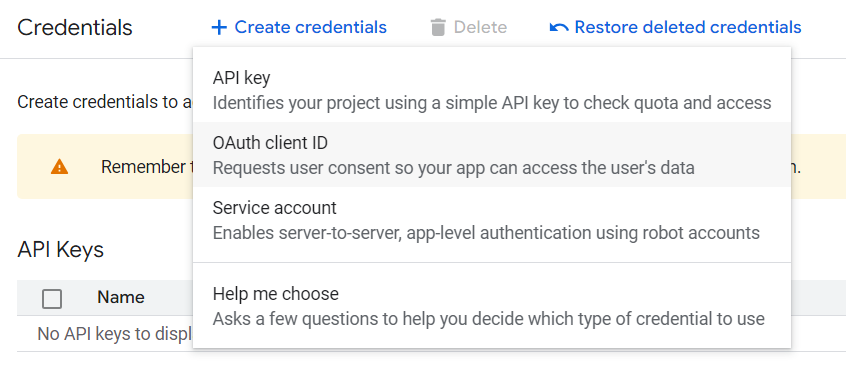
Once you're on the Credentials page, click on + Create Credentials and choose OAuth client ID.
-
Click on Configure consent screen to continue. On the Branding page click Get started.
-
Add an App name and fill in the email address of the user account that is the administrator for this app. Once those details are filled in, click Next.
-
Choose your app's Audience. If you are a part of a Google Workspace, it's best to choose Internal, otherwise choose External and then click Next.
NOTE Choosing External on a personal, non-Workspace Google Account is required. The access token for personal accounts expires every 7 days, requiring logging in again.
-
Under Contact Information, enter in the email addresses for Google to send any developer notifications about your app. Click Next.
-
Finally, check the I agree to the Google API Services: User Data Policy checkbox and click Continue.
-
Finish the process by clicking Create.
-
(For Internal apps only) Navigate to the Branding page. Under Authorized domains, click + Add domain to add the domain or domains within your organization that should be allowed to access your app. Click Save.
-
-
The next page should be the OAuth Overview. Under the Metrics section, click on Create OAuth client. You can also access this from the Clients page, then clicking + Create client.

-
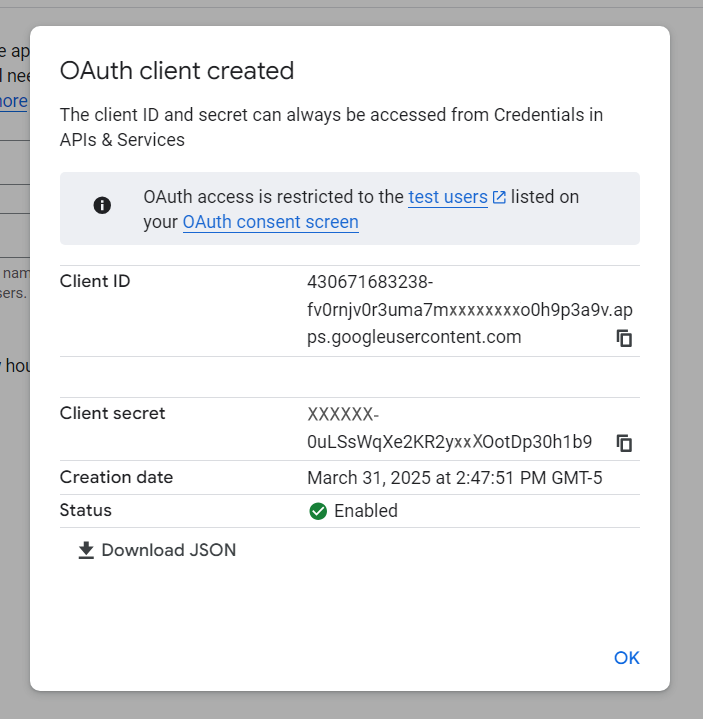
On the Create OAuth client ID page, choose Desktop app for the Application Type and name the client. Click Create. A screen will appear with the Client ID and the Client secret code. These two values are needed to log in to the account using the Media Connector for Google Drive dialog in Templater, so be sure to record them in a safe place for later. You will not be able to access the Client secret after closing the OAuth client created modal. You may also download the details as a JSON file and store it securely for future reference.
WARNING These credentials are sensitive, and should be treated the same as a password that allows full read access to the contents of your Google Drive. If you lose these credentials or if they are compromised, please delete the existing credentials and create new ones. You will then need to re-authorize the Media Connector in Templater.
-
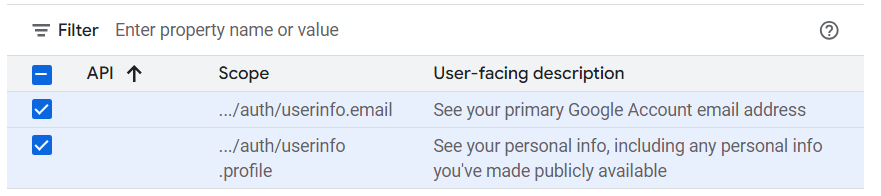
While still in the Google Auth Platform area of GCP, Click Data Access in the left-hand menu and click Add or remove scopes. An Update selected scopes flyout window will open. Select the two checkboxes for the scopes that read:
-
"See your primary Google Account email address" (scope: ../auth/userinfo.email)
-
"See your personal info, including any personal info you’ve made publicly available" (scope: ../auth/userinfo.profile).
-
-
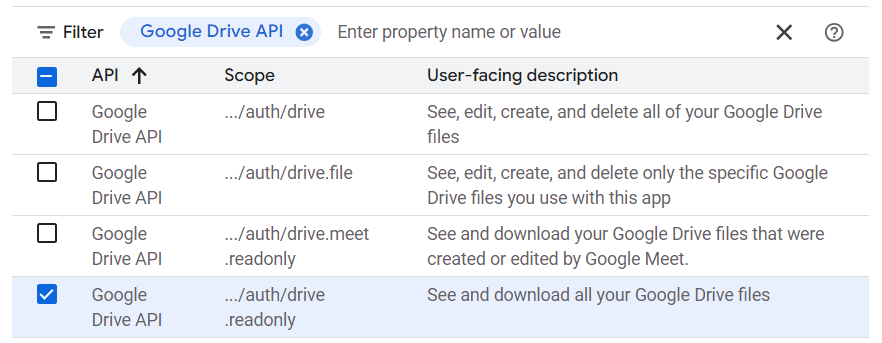
In the same flyout window, type "Google Drive API" in the Enter property name or value filter field and select the Google Drive API entry with the scope ../auth/drive.readonly (description: "See and download all your Google Drive Files"). Depending on the number of results the search returns, you may need to click through to see the required scope appear in the list. Scroll down the flyout and click Update.
-
Verify that the three previously-selected scopes have been added. On the Data Access page, you should see the first two listed under Your non-sensitive scopes, while the third should be under Your restricted scopes. If all the information is present and correct, click Save.
-
If your app is set to be External:
-
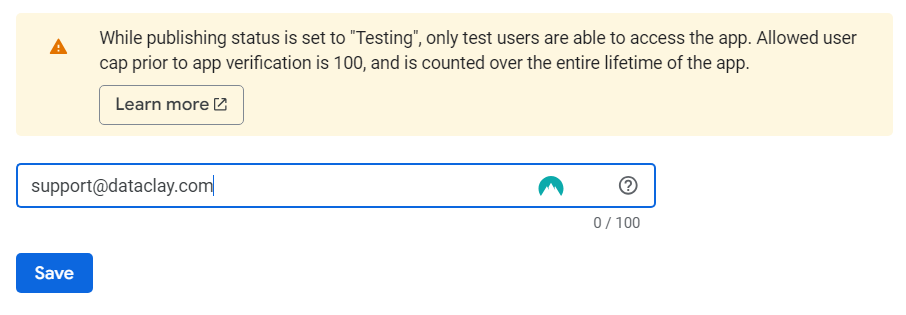
While still in the Google Auth Platform area, click on the Audience listing on the left-hand side and click on Add users under the Test users section.
-
Enter the email address that you will use to authenticate Templater's Media Connector for Google Drive and click Save. If you are an administrator creating this app integration for an organization, you can add multiple email addresses as "test" users here.
WARNING Do not submit your GCP Project's app for review as an "In Production" application. Production apps are for developers sharing their apps with the general public and are subjected to intense security auditing requirements that are not necessary for usage with Templater. Since this app is for your personal use, or use within an organization, it can remain as an Internal or External >Testing app indefinitely.
-
Part 2: Log into your GCP Project via Media Connector for Google Drive
Once you've set up your GCP Project, you will need to connect it to Templater.
-
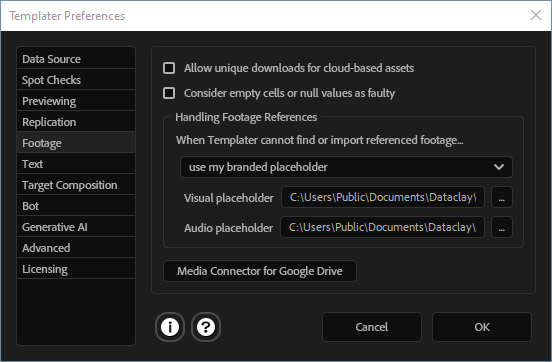
Open After Effects and the Templater panel. Click on the Preferences button. Click on the Footage tab and click Media Connector for Google Drive.
-
Enter the Client ID and the Client Secret code that you generated earlier in this process and then click Sign In.
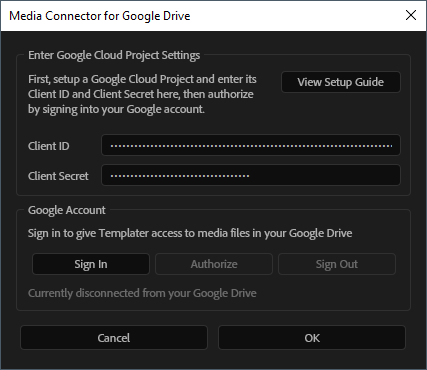
-
Your default browser should launch to open a Google login page. You will be prompted to choose a Google Account. If you created your app with an External audience, you will see a Google hasn’t verified this app message. Once you're signed in, the first authorization page grants access to the non-sensitive data scopes you added earlier. Click Continue to accept. On the second authorization page, you are granting your app access to your Google Drive files. Be sure that See, edit, create, and delete all of your Google Drive files. has its checkbox enabled (if one appears). Click Allow to authorize your app. You should see an access granted success page.
-
If your app was set to be Internal, and you receive an Access blocked... error message, be sure that you are signed into the correct Google Account, then try signing in again.
-
If you are signed into multiple Google accounts under a single browser profile, you may need to sign out of all of the accounts and sign into the correct account.
-
If your browser supports profile switching (such as Google Chrome), and you are signed into multiple accounts so that each account has its own profile, be sure that the browser window with the correct profile was the last selected window. Then, when Templater tries to open the Google Sign in page, it should load in the correct window.
-
-
Returning to the Media Connector for Google Drive modal, click Authorize. If you have successfully set up the integration, you will see a message Connected to Google Drive [<your email address>] in the modal.
If you need to sign out for any reason, you can click Sign Out and repeat the previous steps to re-add the same account or to switch to a new account.
Media Connector pros and cons
Advantages:
-
Full Drive access.
-
Maintains access control within an organization.
-
Only downloads requested files.
-
Possible to set up once: a GCP Project can have multiple users under the same domain's organization.
Disadvantages:
-
Lengthy, advanced setup required.
-
Apps created with non-Workspace Google Accounts require re-authorization every 7 days.
-
Some large files might not download correctly.
-
Possibility of slower processing time while waiting for Templater to download larger media assets (compared to locally-stored footage files).
TIP For Google Drive assets that are very large files, sometimes Templater cannot download them correctly. Instead, the downloaded file is an HTML text file that says Drive was unable to scan for viruses. If you see this error, try providing a direct download link instead of the share link.
Locally-synced files using Google Drive for desktop
Using the Google Drive for desktop app, you can automatically sync media files to the local machine that is running Templater. The Drive app mounts a virtual drive on your machine that is integrated at the operating system level. This works for both personal and Google Workspace My Drive folders, as well as Workspace Shared Drives.
-
For Windows, this will mount each connected Drive account to an available drive letter.
-
For macOS 12.1 and newer, Drive will create a new Location using the built-in File Provider cloud file system. Older versions of macOS use a legacy file streaming system.
Once you install the Drive app, it will sync file updates and additions in both directions for the logged-in Google Accounts. The Drive app gives you the option to stream (Online only) or mirror (Available offline) your files to the local machine. Streaming stores a small file placeholder that triggers downloading a given file upon access. After Effects is not aware that it needs to wait for this OS-level operation, so it will create an error if Templater tries to import a footage asset that hasn't been synced in advance. Mirroring stores a copy of selected files and folders locally, which enables offline access.
TIP For the purposes of After Effects and Templater, any Google Drive folders and files that Templater will need to access should always have the Available offline option enabled.
Important details:
- Rather than using a Google Drive share link to the footage item in your data source, you will use the file name and relative path associated with your Source Footage folder on the virtual drive, the same as if the footage was stored on a local drive.
- If you have a large number of files on your Google Drive, we don't recommend having your entire Drive account mirrored in order to manage storage space on you local drive. Instead you should choose only the folders that you need.
- If you are actively adding large footage files to a synced Drive folder, or are on a weak or slow internet connection, Google Drive for desktop may be slow to sync changes to your local machine. This may cause After Effects to generate errors about corrupted footage. It's also important to know that if you don't enable Available Offline for all files that Templater needs to access, you will also encounter those same errors. You can avoid this by ensuring that all files are mirrored before processing jobs that reference any Google Drive-based footage.
Advantages:
-
Easy to set up.
-
You can be connected to multiple Drive accounts simultaneously.
-
Able to access entire folders and their contents.
-
No special permissions required.
Disadvantages:
-
All files need to be pre-downloaded on the machine running Templater—unsynced and partially-synced files will cause footage corruption errors.
-
Takes up local drive storage space.
Authorize individual files with File Picker (deprecated)
WARNING Due to Google Drive API limitations, access permissions are not inherited from a parent Drive folder. Each file needs to be explicitly authorized.
Authorizing individual files is the most restrictive method available. We don't recommend using this method, as the Google Drive Media Connector was created to replace this workaround due to its limitations. We consider it deprecated, but it will continue to work because it's a feature that is tied to the way Templater connects to Google Sheets via the File Picker.
NOTE Authorizing individual files is limited to the Google Account currently logged into Templater.
Once you have authorized Templater to access your Google Sheets, you can use the same Google Spreadsheet Setup dialog to select your desired footage assets. Under Grant Access to Specific Sheets, click Launch File Picker for Google Drive.
Advantages: Doesn't require extra configuration.
Disadvantages: No folder permissions inheritance. Tedious to manually select files.
TIP For Google Drive assets that are very large files, sometimes Templater cannot download them correctly. Instead, the downloaded file is an HTML text file that says Drive was unable to scan for viruses. If you see this error, try providing a direct download link instead of the share link.
